Monday 30 May 2016

UEFI Boot Process


UEFI Boot Process


The UEFI boot specification offers new capabilities – and new headaches if you aren’t ready for it.

Master Boot Record
Until recently, most computers used the Basic Input Output System (BIOS or legacy BIOS) for managing the boot process. The BIOS performs a few preliminary tasks and then loads the boot sector of the hard disk. This boot sector is called the Master Boot Record (MBR). The MBR is the first 512 bytes at the beginning of the disk that describe not only the layout of the disk (partitions), but also how to start loading the operating system. The MBR has changed slightly over the years, but it is not radically different from when it was first created in 1983.
The MBR contains four primary partitions, and one of these partitions is set as the active or bootable partition. Along with a list of the partitions, the MBR contains a very small (approximately 440 bytes) bootloader to load the operating system. This bootloader will find the active partition and then proceed to execute the Volume Boot Record (the first sector of that partition), which will continue the process of loading the operating system.
The MBR has some limitations that have held back progress. Two such limitations are that the number of primary partitions is limited to four, and the size of disk partitions is limited to 2TB. These limits were not a problem when the MBR first appeared, but now that it is possible to purchase a 3TB USB drive for less than Rs 10000/- , these issues have become more and more visible.
Experts have long recognized a need to break with the past and produce a modern, operating-system-independent firmware with support for booting from large disks, as well as a flexible pre-OS environment, network capability, and a modular design. The Extended Firmware Interface from Intel is the result. An industry-wide organization was formed in 2005 to promote adoption of the EFI specification, and the specification was then renamed Unified EFI (UEFI).

Unified Extended Firmware Interface
The UEFI brings the concept of the BIOS to a whole new level. Instead of a 512-byte MBR and some boot code, the UEFI, in contrast to the legacy BIOS option, knows what a filesystem is and even has its own filesystem, with files and drivers. This filesystem is typically between 200 and 500MB and formatted as FAT32.
Instead of a few bytes of assembly code for loading the operating system, each installed OS should have its own bootloader (e.g., grubx64.efi). This bootloader will have enough logic to either display some sort of boot menu or start loading an operating system. Basically, UEFI is its own mini-operating system.
UEFI has thrown out the old MBR partition methodology and instead uses GPT for managing partition tables. Using GPT eliminates the limitation on the number of partitions and also ensures support for larger partitions of up to 9ZB. (A zettabyte is 1021 bytes.) The GPT partition is part of the UEFI standard, but it is limited to just a list of partitions with no bootloader logic. The specification allows for nearly an unlimited number of partitions, but specific implementations might impose more practical limits. (Windows, for instance, actually limits the number of partitions to 128.) Like the MBR, UEFI marks one of the partitions with the boot flag, but this is only the EFI partition, never any of the OS partitions.
The general structure of the EFI filesystem means that each operating system (or vendor) has its own directory. This directory can contain any and all necessary files for loading the operating system:
 
/EFI
    /Boot
    /Microsoft/
    /ubuntu
    /refind

Some directories have a fairly flat hierarchy, whereas others (e.g., Microsoft’s) are less so. The bootloader programs by default have the extension .efi; however, this is just convention: Bootloader files that are properly created and called work even without this extension.
Looking at the EFI directory structure gives hope that, with the next install or reinstall, another Microsoft operating system will not clobber my existing Linux installation, but I haven’t tried that yet.
One especially convenient thing about how UEFI has been implemented in Linux is that, after the computer is booted up, the EFI partition, at least in Kubuntu, is mounted under the boot partition (/boot/efi), which makes it easy to change or experiment with this filesystem.
Taking this one step further, though, a bootloader is just a program that performs the operation of loading the operating system. What if this program were a shell? A UEFI-capable shell would allow the user to interact with the UEFI system to modify boot parameters, launch bootloaders, and obtain information on the firmware environment. 

The drive designation FS0 refers to File System 0; depending on your configuration, you might also have an FS1 or FS2.
You can register a new shell, a new operating system, or multiple operating systems with UEFI. Thus, the computer itself can seamlessly support multiple operating systems or shells. You have a couple of different options for maintaining these entries.
The first would be using the Linux efibootmgr program to manipulate entries stored in the non-volatile RAM (NVRAM). Depending on the UEFI implementation, your UEFI might actually support efibootmgr when booting into the UEFI/BIOS screen. The Asus N76, which uses the Aptio UEFI-based firmware system from AMI, allows the user to register the program directly with the option Add New Boot Option (Figure 1).
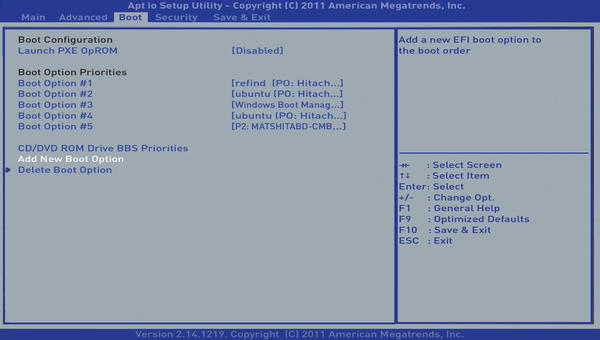
Figure 1: Some firmware systems let you add your own boot option to the configuration.
Eventually, I was able to get this to work when I stopped trying to refer to the drive explicitly (in my case, \EFI\path versus FSO:\EFI\path). It was then possible to try out new bootloaders and a shell. The path entries are relative to the installed EFI partition.

Secure Boot
UEFI offers a lot of flexibility, more partitions, larger partitions, and an easy and standard way for setting up multiple operating systems. What’s not to like? Perhaps you’ve heard of UEFI’s infamous “secure boot” feature.
Secure boot will secure the boot process, preventing drivers or bootloaders that are not signed with a known key. As several sources in the open source community have already reported, this feature would effectively prevent someone from compiling their favorite distribution and installing it on their own PC (at least in the worse case – a somewhat better case would be if the user has the ability to turn off the secure boot feature.)
Fixing My Laptop
My configuration was as follows:
Drive 0:
  • GPT partitioned
  • UEFI filesystem
  • Non-functional Windows installation
Drive 1:
  • MBR partitioned
  • A couple of partitions full of data
  • Non-functional Linux installation
The incompatibility of GPT and MBR, and my subsequent repair efforts, left the system unbootable. When I first added Linux, the pre-existing bootloader couldn't boot the Linux system on the MBR-partitioned Drive 1. I tried changing the boot drive, which gave me my Linux back–including a GRUB menu that pointed to the Windows boot option, but Windows would not start successfully. To get Windows back, I tried to use the Windows Restore option, but it actually caused even more problems, eventually rendering my Linux system unbootable.
How did I correct the problems with my dual-boot mess? The ease of my recovery was because I had a backup image of the first disk prior to any installation of Linux, because Linux was being installed on the second disk, and because I recognized the need to install ubuntu with EFI support.
The list of tasks was quite small:
1. Convert drive 1 from MBR to GPT
2. Add/modify partitions on drive 1
3. Install ubuntu with EFI support
4. Save all EFI configuration from ubuntu install
5. Restore disk image for drive 0
6. Restore ubuntu setup to EFI partition
7. Reboot and test
Note: When dealing with partitions, it is important to back up important data.

Convert MBR to GPT
The laptop was booted with ubuntu 16.04 with a Live DVD. The partitions were fine; the problem was the partitioning, so the easiest thing was to use the sgdisk command to read in the old MBR partition table and write out a new GTP partition table.
It is important to keep in mind that there must be some free space to hold the new GPT structures. This might require resizing the first partition to leave some space free at the start of the disk, as well as resizing the final partition to leave some space at the end.
Once all preparation has been done, the following command performs the conversion:
sgdisk -g /dev/sdX
This command will do the proper conversion but will leave the drive without any bootable operating system.

Add/Modify Partitions
All partitioning was done during my previous install; no additional partitioning was necessary in this case. (You could also perform partitioning in the step in which you install ubuntu.)

Install ubuntu 16.04 with EFI Support
This step is easy but not 100% obvious. When you put a CD or DVD into the optical drive and boot, the UEFI will examine what media might be available; this could be a USB stick or a bootable DVD.
However, at least for my lapi, both a normal MBR-bootable DVD and a UEFI-bootable DVD were found in the list of bootable devices. Even though both entries refer to the same disk, it is important that the UEFI entry is chosen because the UEFI entry seems to be the trigger for using the EFI GRUB rather than the standard MBR setup. On my Asus, UEFI-bootable devices are prefixed with UEFI: in the boot list (Figure 2).
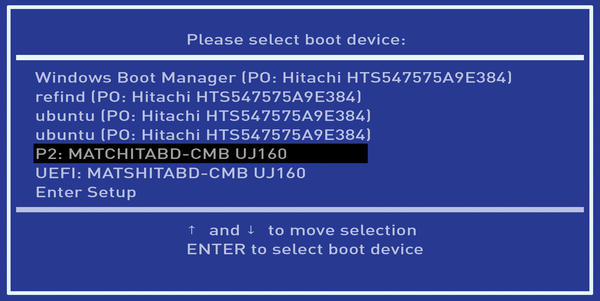
Figure 2: On my lapi, UEFI-ready boot devices are prefaced with UEFI:.
When you boot ubuntu as a UEFI device, it will bring up a familiar GRUB menu list. It is possible that any of these choices will successfully install any UEFI-compliant system, but I chose Install Expert Mode.
The process closely follows a standard graphic installation; I set up my swap (/) and /home partitions and selected GRUB as the bootloader. The only trick for this step is how you boot the disk.
Save ubuntu Configuration Files
The EFI partition is simply a FAT32 file system. Backing up the setup simply means copying the files to a safe location. Simply mount the EFI filesystem and copy the necessary files elsewhere:
 
mount /dev/sdX1 /mnt/mountpoint
cp -rp /mnt/mountpoint/EFI/refind /media/usbstick
cp -rp /mnt/mountpoint/EFI/ubuntu /media/usbstick

Note: your EFI directory will probably be partition 1, sdX1, but this doesn’t have to be the case.

Restore the Disk Image for disk1
I had never planned to make a mess of my installation, but before I started this grand adventure, I backed up drive 0 using dd:
Save: 
 dd bs=1M if=/dev/sdX of=/media/usbdevice/saved-image

Restore: 
dd bs=1M if=/media/usbdevice/saved-image of=/dev/sdX

At this point, the laptop drive 0 has the original Windows 7 installation, but the ubuntu bootloader setup has been lost. This has nothing to do with Microsoft or Windows but rather how I backed up the disk.

Restore the ubuntu EFI Configuration
The laptop was booted with ubuntu 16.04 on a Live DVD for this next step.
The EFI partition is simply a FAT32 file system. Restoring the setup simply means copying the files from a safe location:
 
mount /dev/sdX1 /mnt/mountpoint
cp -rp /media/usbstick/refind /mnt/mountpoint/EFI
cp -rp /media/usbstick/ubuntu /mnt/mountpoint/EFI

After restoring these files, I was able to reboot the lapi and start Linux or Windows 7.

Wednesday 25 May 2016

MySQLAdmin command reference with MySQL server


 MySQLAdmin command line utility


mysqladmin is a command-line utility the comes with MySQL server and it is used by Database Administrators to perform some basic MySQL tasks easily such as setting root password, changing root password, monitoring mysql processes, reloading privileges, checking server status etc.

1. How to set MySQL Root password?

If you have fresh installation of MySQL server, then it doesn’t required any password to connect it as root user. To set MySQL password for root user, use the following command.
# mysqladmin -u root password <YOURNEWPASSWORD>

2. How to Change MySQL Root password?

If you would like to change or update MySQL root password, then you need to type the following command. For example, say your old password is abcd and you want to change it with new password say 123.
mysqladmin -u root -p <abcd> password '123'

3. How to check MySQL Server is running?

To find out whether MySQL server is up and running, use the following command.
# mysqladmin -u root -p ping

Enter password:
mysqld is alive

4. How to Check which MySQL version I am running?

The following command shows MySQL version along with the current running status .
# mysqladmin -u root -p version

Enter password:
mysqladmin  Ver 8.42 Distrib 5.5.28, for Linux on i686
Copyright (c) 2000, 2012, Oracle and/or its affiliates. All rights reserved.

Oracle is a registered trademark of Oracle Corporation and/or its
affiliates. Other names may be trademarks of their respective
owners.

Server version          5.5.28
Protocol version        10
Connection              Localhost via UNIX socket
UNIX socket             /var/lib/mysql/mysql.sock
Uptime:                 7 days 14 min 45 sec

Threads: 2  Questions: 36002  Slow queries: 0  Opens: 15  Flush tables: 1  Open tables: 8  Queries per second avg: 0.059

5. How to Find out current Status of MySQL server?

To find out current status of MySQL server, use the following command. The mysqladmin command shows the status of uptime with running threads and queries.
# mysqladmin -u root -ptmppassword status

Enter password:
Uptime: 606704  Threads: 2  Questions: 36003  Slow queries: 0  Opens: 15  Flush tables: 1  Open tables: 8  Queries per second avg: 0.059

6. How to check status of all MySQL Server Variable’s and value’s?

To check all the running status of MySQL server variables and values, type the following command. The output would be similar to below.
# mysqladmin -u root -p extended-status

Enter password:
+------------------------------------------+-------------+
| Variable_name                            | Value       |
+------------------------------------------+-------------+
| Aborted_clients                          | 3           |
| Aborted_connects                         | 3           |
| Binlog_cache_disk_use                    | 0           |
| Binlog_cache_use                         | 0           |
| Binlog_stmt_cache_disk_use               | 0           |
| Binlog_stmt_cache_use                    | 0           |
| Bytes_received                           | 6400357     |
| Bytes_sent                               | 2610105     |
| Com_admin_commands                       | 3           |
| Com_assign_to_keycache                   | 0           |
| Com_alter_db                             | 0           |
| Com_alter_db_upgrade                     | 0           |
| Com_alter_event                          | 0           |
| Com_alter_function                       | 0           |
| Com_alter_procedure                      | 0           |
| Com_alter_server                         | 0           |
| Com_alter_table                          | 0           |
| Com_alter_tablespace                     | 0           |
+------------------------------------------+-------------+

7. How to see all MySQL server Variables and Values?

To see all the running variables and values of MySQL server, use the command as follows.
# mysqladmin  -u root -p variables

Enter password:
+---------------------------------------------------+----------------------------------------------+
| Variable_name                                     | Value                                        |
+---------------------------------------------------+----------------------------------------------+
| auto_increment_increment                          | 1                                            |
| auto_increment_offset                             | 1                                            |
| autocommit                                        | ON                                           |
| automatic_sp_privileges                           | ON                                           |
| back_log                                          | 50                                           |
| basedir                                           | /usr                                         |
| big_tables                                        | OFF                                          |
| binlog_cache_size                                 | 32768                                        |
| binlog_direct_non_transactional_updates           | OFF                                          |
| binlog_format                                     | STATEMENT                                    |
| binlog_stmt_cache_size                            | 32768                                        |
| bulk_insert_buffer_size                           | 8388608                                      |
| character_set_client                              | latin1                                       |
| character_set_connection                          | latin1                                       |
| character_set_database                            | latin1                                       |
| character_set_filesystem                          | binary                                       |
| character_set_results                             | latin1                                       |
| character_set_server                              | latin1                                       |
| character_set_system                              | utf8                                         |
| character_sets_dir                                | /usr/share/mysql/charsets/                   |
| collation_connection                              | latin1_swedish_ci                            |
+---------------------------------------------------+----------------------------------------------+

8. How to check all the running Process of MySQL server?

The following command will display all the running process of MySQL database queries.
# mysqladmin -u root -p processlist

Enter password:
+-------+---------+-----------------+---------+---------+------+-------+------------------+
| Id    | User    | Host            | db      | Command | Time | State | Info             |
+-------+---------+-----------------+---------+---------+------+-------+------------------+
| 18001 | rsyslog | localhost:38307 | rsyslog | Sleep   | 5590 |       |                  |
| 18020 | root    | localhost       |         | Query   | 0    |       | show processlist |
+-------+---------+-----------------+---------+---------+------+-------+------------------+

9. How to create a Database in MySQL server?

To create a new database in MySQL server, use the command as shown below.
# mysqladmin -u root -p create databasename

Enter password:
# mysql -u root -p

Enter password:
Welcome to the MySQL monitor.  Commands end with ; or \g.
Your MySQL connection id is 18027
Server version: 5.5.28 MySQL Community Server (GPL) by Remi

Copyright (c) 2000, 2012, Oracle and/or its affiliates. All rights reserved.

Oracle is a registered trademark of Oracle Corporation and/or its
affiliates. Other names may be trademarks of their respective
owners.

Type 'help;' or '\h' for help. Type '\c' to clear the current input statement.

mysql> show databases;
+--------------------+
| Database           |
+--------------------+
| information_schema |
| databasename       |
| mysql              |
| test               |
+--------------------+
8 rows in set (0.01 sec)

mysql>

10. How to drop a Database in MySQL server?

To drop a Database in MySQL server, use the following command. You will be asked to confirm press ‘y‘.
# mysqladmin -u root -p drop databasename

Enter password:
Dropping the database is potentially a very bad thing to do.
Any data stored in the database will be destroyed.

Do you really want to drop the 'databasename' database [y/N] y
Database "databasename" dropped

11. How to reload/refresh MySQL Privileges?

The reload command tells the server to reload the grant tables. The refresh command flushes all tables and reopens the log files.
# mysqladmin -u root -p reload;
# mysqladmin -u root -p refresh

12. How to shutdown MySQL server Safely?

To shutdown MySQL server safely, type the following command.
mysqladmin -u root -p shutdown

Enter password:
You can also use the following commands to start/stop MySQL server.
# /etc/init.d/mysqld stop
# /etc/init.d/mysqld start

13. Some useful MySQL Flush commands

Following are some useful flush commands with their description.
  1. flush-hosts: Flush all host information from host cache.
  2. flush-tables: Flush all tables.
  3. flush-threads: Flush all threads cache.
  4. flush-logs: Flush all information logs.
  5. flush-privileges: Reload the grant tables (same as reload).
  6. flush-status: Clear status variables.
# mysqladmin -u root -p flush-hosts
# mysqladmin -u root -p flush-tables
# mysqladmin -u root -p flush-threads
# mysqladmin -u root -p flush-logs
# mysqladmin -u root -p flush-privileges
# mysqladmin -u root -p flush-status

14. How to kill Sleeping MySQL Client Process?

Use the following command to identify sleeping MySQL client process.
# mysqladmin -u root -p processlist

Enter password:
+----+------+-----------+----+---------+------+-------+------------------+
| Id | User | Host      | db | Command | Time | State | Info             |
+----+------+-----------+----+---------+------+-------+------------------+
| 5  | root | localhost |    | Sleep   | 14   |       |      |
| 8  | root | localhost |    | Query   | 0    |       | show processlist |
+----+------+-----------+----+---------+------+-------+------------------+
Now, run the following command with kill and process ID as shown below.
# mysqladmin -u root -p kill 5

Enter password:
+----+------+-----------+----+---------+------+-------+------------------+
| Id | User | Host      | db | Command | Time | State | Info             |
+----+------+-----------+----+---------+------+-------+------------------+
| 12 | root | localhost |    | Query   | 0    |       | show processlist |
+----+------+-----------+----+---------+------+-------+------------------+
If you like to kill multiple process, then pass the process ID‘s with comma separated as shown below.
# mysqladmin -u root -p kill 5,10

15. How to run multiple mysqladmin commands together?

If you would like to execute multiple ‘mysqladmin‘ commands together, then the command would be like this.
# mysqladmin  -u root -p processlist status version

Enter password:
+----+------+-----------+----+---------+------+-------+------------------+
| Id | User | Host      | db | Command | Time | State | Info             |
+----+------+-----------+----+---------+------+-------+------------------+
| 8  | root | localhost |    | Query   | 0    |       | show processlist |
+----+------+-----------+----+---------+------+-------+------------------+
Uptime: 3801  Threads: 1  Questions: 15  Slow queries: 0  Opens: 15  Flush tables: 1  Open tables: 8  Queries per second avg: 0.003
mysqladmin  Ver 8.42 Distrib 5.5.28, for Linux on i686
Copyright (c) 2000, 2012, Oracle and/or its affiliates. All rights reserved.

Oracle is a registered trademark of Oracle Corporation and/or its
affiliates. Other names may be trademarks of their respective
owners.

Server version          5.5.28
Protocol version        10
Connection              Localhost via UNIX socket
UNIX socket             /var/lib/mysql/mysql.sock
Uptime:                 1 hour 3 min 21 sec

Threads: 1  Questions: 15  Slow queries: 0  Opens: 15  Flush tables: 1  Open tables: 8  Queries per second avg: 0.003

16. How to Connect remote mysql server

To connect remote MySQL server, use the -h (host)  with IP Address of remote machine.
# mysqladmin  -h 172.16.25.126 -u root -p

17. How to execute command on remote MySQL server

Let’s say you would like to see the status of remote MySQL server, then the command would be.
# mysqladmin  -h 172.16.25.126 -u root -p status

18. How to start/stop MySQL replication on a slave server?

To start/stop on salve server, use the following commands.
# mysqladmin  -u root -p start-slave
# mysqladmin  -u root -p stop-slave

19. How to store MySQL server Debug Information to logs?

It tells the server to write debug information about locks in use, used memory and query usage to the MySQL log file including information about event scheduler.
# mysqladmin  -u root -p debug

Enter password:

20. How to view mysqladmin options and usage

To find out more options and usage of myslqadmin command use the help command as shown below. It will display a list of available options.
# mysqladmin --help
 
 
Thank you........ 

MySQL Installation on CentOS/Redhat

Install and Start MySQL

  1. Install MySQL and tell it which runlevels to start on:
    
    
     yum install mysql-server
     /sbin/chkconfig --levels 235 mysqld on 
    
  2. Then to start the MySQL server:

    service mysqld start
    
    MySQL will bind to localhost (127.0.0.1) by default.
Allowing unrestricted access to MySQL on a public IP not advised, but you may change the address it listens on by modifying the bind-address parameter in /etc/my.cnf. If you decide to bind MySQL to your public IP, you should implement firewall rules that only allow connections from specific IP addresses.

Harden MySQL Server

  1. Run the mysql_secure_installation script to address several security concerns in a default MySQL installation.

    mysql_secure_installation
    
You will be given the choice to change the MySQL root password, remove anonymous user accounts, disable root logins outside of localhost, and remove test databases. It is recommended that you answer yes to these options.

Using MySQL

The standard tool for interacting with MySQL is the mysql client which installs with the mysql-server package. The MySQL client is used through a terminal.

Root Login

  1. To log in to MySQL as the Root User:

    mysql -u root -p
    
  2. When prompted, enter the root password you assigned when the mysql_secure_installation script was run.
    You’ll then be presented with the MySQL monitor display:
    1
    2
    3
    4
    5
    6
    7
     Welcome to the MySQL monitor.  Commands end with ; or \g.
     Your MySQL connection id is 1
     Server version: 5.0.45 Source distribution
    
     Type 'help;' or '\h' for help. Type '\c' to clear the buffer.
    
     mysql>
    
  3. To generate a list of commands for the MySQL prompt, enter \h. You’ll then see:
    1
    2
    3
    4
    5
    6
    7
    8
    9
    10
    11
    12
    13
    14
    15
    16
    17
    18
    19
    20
    21
    22
    23
    24
    25
    26
    27
    28
    29
    30
     List of all MySQL commands:
     Note that all text commands must be first on line and end with ';'
     ?         (\?) Synonym for `help'.
     clear     (\c) Clear command.
     connect   (\r) Reconnect to the server. Optional arguments are db and host.
     delimiter (\d) Set statement delimiter. NOTE: Takes the rest of the line as new delimiter.
     edit      (\e) Edit command with $EDITOR.
     ego       (\G) Send command to mysql server, display result vertically.
     exit      (\q) Exit mysql. Same as quit.
     go        (\g) Send command to mysql server.
     help      (\h) Display this help.
     nopager   (\n) Disable pager, print to stdout.
     notee     (\t) Don't write into outfile.
     pager     (\P) Set PAGER [to_pager]. Print the query results via PAGER.
     print     (\p) Print current command.
     prompt    (\R) Change your mysql prompt.
     quit      (\q) Quit mysql.
     rehash    (\#) Rebuild completion hash.
     source    (\.) Execute an SQL script file. Takes a file name as an argument.
     status    (\s) Get status information from the server.
     system    (\!) Execute a system shell command.
     tee       (\T) Set outfile [to_outfile]. Append everything into given outfile.
     use       (\u) Use another database. Takes database name as argument.
     charset   (\C) Switch to another charset. Might be needed for processing binlog with multi-byte charsets.
     warnings  (\W) Show warnings after every statement.
     nowarning (\w) Don't show warnings after every statement.
    
     For server side help, type 'help contents'
    
     mysql>
    

Create a New MySQL User and Database

  1. In the example below, testdb is the name of the database, testuser is the user, and password is the user’s password.

     create database testdb;
     create user 'testuser'@'localhost' identified by 'password';
     grant all on testdb.* to 'testuser' identified by 'password';
    
    You can shorten this process by creating the user while assigning database permissions:
    
    
     create database testdb;
     grant all on testdb.* to 'testuser' identified by 'password';
    
  2. Then exit MySQL.
    
    
    exit
    

Create a Sample Table

  1. Log back in as testuser.
    
    
    mysql -u testuser -p
    
  2. Create a sample table called customers. This creates a table with a customer ID field of the type INT for integer (auto-incremented for new records, used as the primary key), as well as two fields for storing the customer’s name.
    
    
    use testdb;
    create table customers (customer_id INT NOT NULL AUTO_INCREMENT PRIMARY KEY, first_name TEXT, last_name TEXT);
    
  3. Then exit MySQL.
    
    
    exit
    

Reset the MySQL Root Password

If you forget your root MySQL password, it can be flushed and then reset.
  1. Stop the current MySQL server instance, then restart it with an option to not ask for a password.

     /etc/init.d/mysqld stop
     mysqld_safe --skip-grant-tables &
    
  2. Reconnect to the MySQL server with the MySQL root account.

    mysql -u root
    
  3. Use the following commands to reset root’s password. Replace password with a strong password.

    use mysql;
     update user SET PASSWORD=PASSWORD("password") WHERE USER='root';
     flush privileges;
     exit
    
  4. Then restart MySQL.

    service mysqld restart
    
You’ll now be able to log in again using mysql -u root -p.

Tuesday 24 May 2016

Install Java in Centos / Redhat

Java Installation Step by Step

Downloading Latest Java Archive

Download latest Java SE Development Kit 8 release from its official download page or use following commands to download from shell.

For 64Bit

# cd /opt/
# wget --no-cookies --no-check-certificate --header 
"Cookie: gpw_e24=http%3A%2F%2Fwww.oracle.com%2F; oraclelicense=accept-securebackup-cookie" 
"http://download.oracle.com/otn-pub/java/jdk/8u91-b14/jdk-8u91-linux-x64.tar.gz"

# tar xzf jdk-8u91-linux-x64.tar.gz

For 32Bit

# cd /opt/
# wget --no-cookies --no-check-certificate --header 
"Cookie: gpw_e24=http%3A%2F%2Fwww.oracle.com%2F; oraclelicense=accept-securebackup-cookie"
"http://download.oracle.com/otn-pub/java/jdk/8u91-b14/jdk-8u91-linux-i586.tar.gz"

# tar xzf jdk-8u91-linux-i586.tar.gz
 

Install Java with Alternatives

After extracting archive file use alternatives command to install it. alternatives command is available in chkconfig package.

# cd /opt/jdk1.8.0_91/
# alternatives --install /usr/bin/java java /opt/jdk1.8.0_91/bin/java 2
# alternatives --config java


There are 3 programs which provide 'java'.

  Selection    Command
-----------------------------------------------
*  1           /opt/jdk1.7.0_71/bin/java
 + 2           /opt/jdk1.8.0_45/bin/java
   3           /opt/jdk1.8.0_77/bin/java
   4           /opt/jdk1.8.0_91/bin/java

Enter to keep the current selection[+], or type selection number: 4

At this point JAVA 8 has been successfully installed on your system. We also recommend to setup javac and jar commands path using alternatives

# alternatives --install /usr/bin/jar jar /opt/jdk1.8.0_91/bin/jar 2
# alternatives --install /usr/bin/javac javac /opt/jdk1.8.0_91/bin/javac 2
# alternatives --set jar /opt/jdk1.8.0_91/bin/jar
# alternatives --set javac /opt/jdk1.8.0_91/bin/javac

Check Installed Java Version

Check the installed Java version on your system using following command.
root@tecadmin ~# java -version

java version "1.8.0_91"
Java(TM) SE Runtime Environment (build 1.8.0_91-b14)
Java HotSpot(TM) 64-Bit Server VM (build 25.91-b14, mixed mode)

Configuring Environment Variables

Most of Java based application’s uses environment variables to work. Set the Java environment variables using following commands
  • Setup JAVA_HOME Variable
  • # export JAVA_HOME=/opt/jdk1.8.0_91
    
  • Setup JRE_HOME Variable
  • # export JRE_HOME=/opt/jdk1.8.0_91/jre
    
  • Setup PATH Variable
  • # export PATH=$PATH:/opt/jdk1.8.0_91/bin:/opt/jdk1.8.0_91/jre/bin
    
Also put all above environment variables in /etc/environment file for auto loading on system boot.

Thank you..